먼저 버튼 두개를 만드는 탭을 구성 해봅시다.
import React, { useState } from "react";
import ReactDOM from "react-dom";

const content = [
  {
    tab: "Section 1",
    content: "I'm the content of the Section 1"
  },
  {
    tab: "Section 2",
    content: "I'm the content of the Section 2"
  }
];

const App = () => {
  return (
    <div>
      {content.map(section => (
        <button>{section.tab}</button>
      ))}
    </div>
  );
};

const rootElement = document.getElementById("root");
ReactDOM.render(<App />, rootElement);
여기서 노마드는 물어봅니다.
모두가 아닌 내가 원하는 콘텐츠만 띄워주는건 어떻게 구성하면 간편하고 쌈빡할까?
바로 이런식으로 합니다.
import React, { useState } from "react";
import ReactDOM from "react-dom";

const content = [
  {
    tab: "Section 1",
    content: "I'm the content of the Section 1"
  },
  {
    tab: "Section 2",
    content: "I'm the content of the Section 2"
  }
];

const useTabs = (initialTab, allTabs) => {
  if (!allTabs || !Array.isArray(allTabs)) {
    return;
  }
  const [currentIndex, setCurrentIndex] = useState(initialTab);
  return {
    currentItem: allTabs[currentIndex]
  };
};

const App = () => {
  const { currentItem } = useTabs(0, content);
  return (
    <div>
      {content.map(section => (
        <button>{section.tab}</button>
      ))}
      <div>{currentItem.content}</div>
    </div>
  );
};

const rootElement = document.getElementById("root");
ReactDOM.render(<App />, rootElement);
이렇게 하면 App부분에서 useTabs 할때 파라미터 인덱스 값만 바꾸어주면 왔다갔다 됩니다.
이걸 자동화 해봅시다.
import React, { useState } from "react";
import ReactDOM from "react-dom";

const content = [
  {
    tab: "Section 1",
    content: "I'm the content of the Section 1"
  },
  {
    tab: "Section 2",
    content: "I'm the content of the Section 2"
  }
];

const useTabs = (initialTab, allTabs) => {
  if (!allTabs || !Array.isArray(allTabs)) {
    return;
  }
  const [currentIndex, setCurrentIndex] = useState(initialTab);
  return {
    currentItem: allTabs[currentIndex],
    changeItem: setCurrentIndex
  };
};

const App = () => {
  const { currentItem, changeItem } = useTabs(0, content);
  return (
    <div>
      {content.map((section, index) => (
        <button onClick={() => changeItem(index)}>{section.tab}</button>
      ))}
      <div>{currentItem.content}</div>
    </div>
  );
};

const rootElement = document.getElementById("root");
ReactDOM.render(<App />, rootElement);
Hooks 사용이 미숙해 이해를 못하겠더군요.. 초보코더라
해석해보니..
useTabs에서 리턴값을 오브젝트로 두가지 넘겨주기에 오브젝트로 두가지 받을 수 있게 구성해두고,
받았을때 버튼이 생성됩니다. 콘텐츠와 함께요. 그리고 map함수에서 index의 값을 사용하여 버튼 onClick시
changeItem을 실행하게 되고, 위 changeItem은 내부에 보시면 인덱스값이 다르게 들어가 currentIndex가 다르게 들어가게 되고, (스테이트 값의 변동) currentIndex 스테이트값이 바뀌면 currentItem의 값이 기존에 만들때 allTabs[0]에서 allTabs[1]로 바뀌게 됩니다.그러면 div 제일 하단에 {currentItem.content}로 출력하던 부분에서 currentItem이 [1]로 바뀌었기에 content 1번을 출력하게 되는 구조입니다.
말이 되게 어려운데 제대로 이해하시려면 한번 흐름을 뜯어먹어 보시기 바랍니다.
버튼클릭 - changeItem(버튼index)실행 - currentIndex스테이트 값 변경 - 재랜더링 - App시작 시 0번을 넘겼지만 currentIndex는 이미 변경됐으므로 리턴에서 currentItem은 allTabs[index]를 리턴하여 바뀌게 됨.
쉬운 예시가 아래에 있습니다.
import React, { useState } from "react";
import ReactDOM from "react-dom";


const StateTest = (index) => {
  console.log("index: ",index)
  const [t1, setT1] = useState(index);
  console.log("State: ",t1)
  return {
    currentItem: t1,
    changeItem: setT1
  };
}

const App = () => {
  const {currentItem, changeItem} = StateTest(0)

  return (
    <div>
      <h1>{currentItem}</h1>
      <button onClick={() => changeItem(0)}>0</button>
      <button onClick={() => changeItem(1)}>1</button>
      <button onClick={() => changeItem(2)}>2</button>
    </div>
  );
};

const rootElement = document.getElementById("root");
ReactDOM.render(<App />, rootElement);
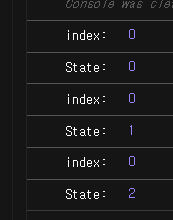
위 예제와 비슷한 예시입니다. 콘솔을 보시면 아시겠지만, State의 변동이 일어나서 재 랜더링 할때에도 여전히 App 최상단에 StateTest(0)이 있기에 index는 콘솔로 0이 계속 찍히게 됩니다. 하지만 State의 값은 변동이 있죠.
처음 하면서 헷갈린게 함수안에 const [t1, setT1] = useState(index) 라고 되어있어, 재 랜더링 하고 함수를 들어갈때마다 index값의 변동이 없기에 무조건 0으로 초기화될줄 알았는데, setT1을 함수로 changeItem에 전달했고, 그걸 통하면 changeItem(param)을 하면 스테이트 값만 쏙 바뀌더라구요? 완전 논리적으로 파고드는 스타일이 아닌지라 그런 이유까진 정확히 모르겠습니다만,,, 이렇게 알고 넘어가려구요
'모바일 > React' 카테고리의 다른 글
| React에 TMap 적용하기 (React 외부 Html Script 태그 사용법) (0) | 2020.11.03 |
|---|---|
| 노마드와 함께하는 Hooks -3 (useEffect) (0) | 2020.04.29 |
| 노마드와 함께하는 Hooks -1 (0) | 2020.04.28 |
| Electron + React ( empty project ) (0) | 2020.04.24 |
| React에 C++,C#등 Dll을 올리는 법 ( 번외. Electron 쿠키 ) (0) | 2020.04.23 |